More router config?
To configure your wireless router, specifically an Asus model in this case, for a new Linux server on your local network, follow these steps:
- Assign a Static IP Address: Ensure that your Linux server has a static IP address on your local network. You can achieve this by either manually setting a static IP on the server or configuring your router’s DHCP settings to always assign the same IP address to the server.
- Set Up Port Forwarding: Enable port forwarding on your router for ports 80 (HTTP) and 443 (HTTPS). This will allow incoming traffic on these ports to be directed to your Linux server, enabling it to serve web content.
- Optional – SSH Port Forwarding: If you wish to remotely manage your Linux server over the internet, you can set up port forwarding for SSH (typically port 22). However, this can be a security risk if not configured properly. Ensure that you secure SSH access by using strong passwords or key-based authentication and consider installing security software like fail2ban to protect against unauthorized access attempts.
Please note that the exact steps to configure these settings may vary depending on your router’s firmware and interface. Always ensure your router and server are secured to prevent unauthorized access.
Setting up a static IP address for your linux server
To ensure your Linux server always receives the same IP address on your local network, you can use one of two methods:
- Manual IP Configuration: Set a static IP address on your server and configure your router’s DHCP server to exclude this address from its pool to prevent conflicts.
- DHCP Reservation: Use your router’s DHCP server to assign a fixed IP address to your server based on its MAC address. This way, the server will always receive the same IP address, even after reboots.
I’ll explain how to set up the second method, DHCP reservation, as it’s generally simpler to manage.
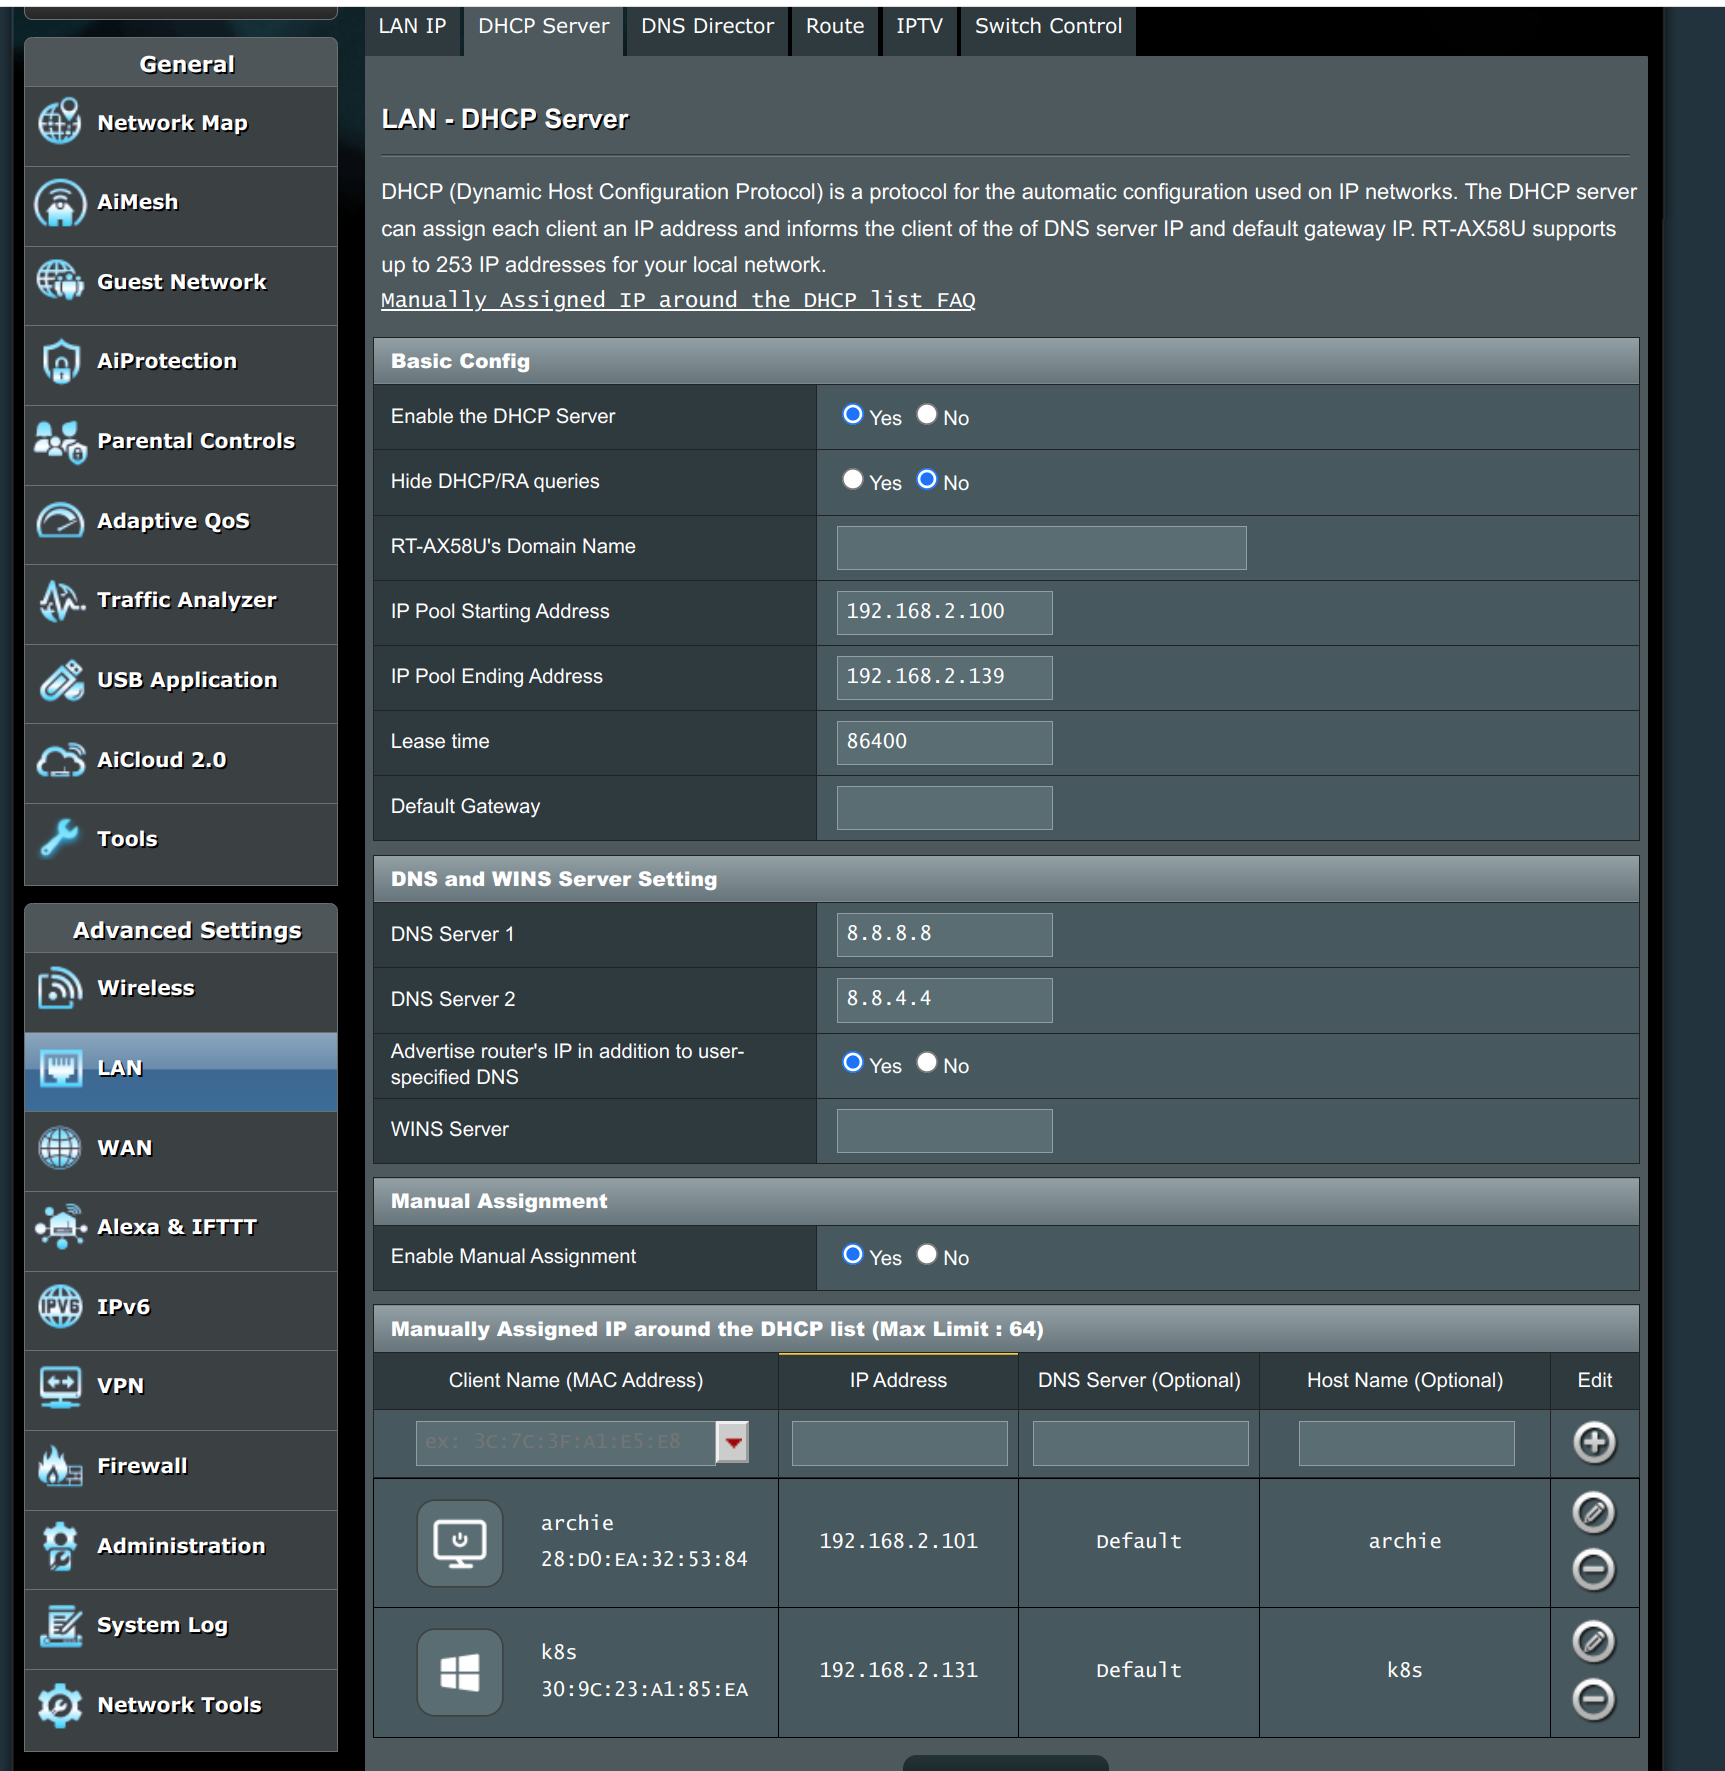
In the screenshot of my DHCP router setup, you can see it’s accessed via the LAN sidebar menu under the “DHCP Server” tab. In the “Basic Config” section, I’ve configured the router to distribute up to 40 IP addresses, starting from 192.168.2.100.
At the bottom, there’s a section for “Manual Assignment,” where I’ve listed two entries. Each entry pairs a computer’s MAC address (a unique identifier for a network interface) with a specific IP address. When a computer starts up, it doesn’t have an IP address and sends a broadcast request over the network, like “I am a device with MAC address ba:de:be:ff:00:00, and I need an IP address.” The DHCP server responds by assigning an IP address, a network mask, and a gateway address, typically choosing a random available address from its pool.
However, the “Manual Assignment” interface allows us to link a specific MAC address to a fixed IP address. This tells the DHCP server to always assign the same IP address whenever that particular MAC address requests an IP.
To find your MAC address, you can use the ip link command. This command will display information about all network interfaces on your computer, including their MAC addresses. Look for the “link/ether” field in the output to find the MAC address of each interface.

This output shows a list of your network adapters. In this example, the computer named “archie” is connected to the network via the wlan0 interface, and its MAC address is highlighted. You can see that the MAC address matches the one configured in the router. Running the ifconfig command reveals that the wlan0 adapter has been assigned the IP address 192.168.1.101, as we specified in the router settings. This setup provides a consistent, static IP address for our Linux computer, which we’ve named “k8s” in this example.
Port forwarding
Most routers come with a built-in firewall that blocks all incoming requests from the internet by default. When your computer initiates a connection, such as downloading a file, the response is allowed back because it’s associated with an originating IP address. Network Address Translation (NAT) is a mechanism that keeps internal addresses hidden from the wider internet while allowing responses to incoming requests.
If you want to run a server, you’ll need to configure your router to forward specific traffic to your server. For example, if you’re running a WordPress site on an Nginx web server, you’ll mostly need to forward traffic on port 443 (for secure HTTPS traffic) and possibly port 80 (for unsecured HTTP traffic). This is typically referred to as “port forwarding” in your router’s settings, often found under the WAN or Virtual Server/Port Forwarding section.
It’s important to be cautious when opening ports on your router, as they can quickly become targets for unauthorized access attempts. For instance, my WordPress server frequently receives login attempts with common username and password combinations. To mitigate this, I use a WordPress plugin that limits the number of failed login attempts.
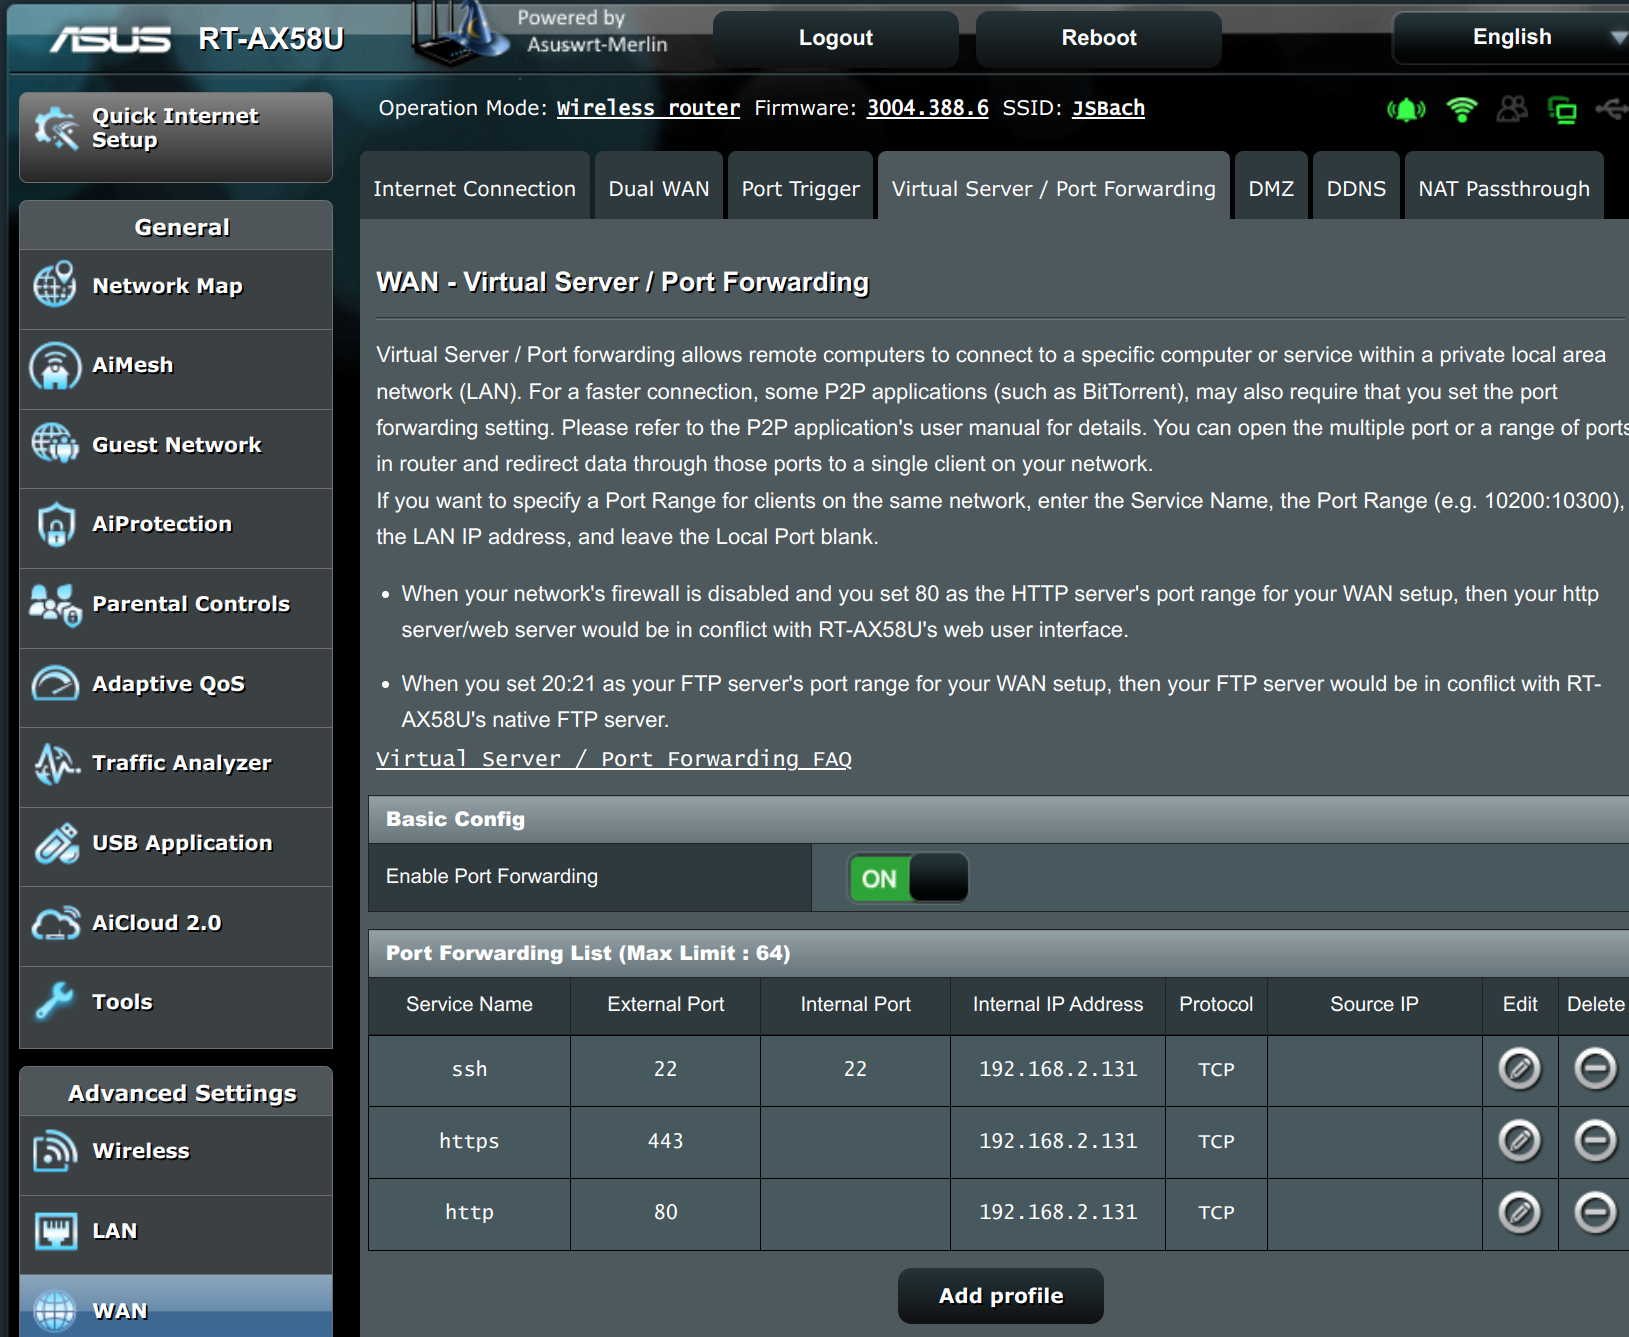
Here, you can see that I’ve opened port 22 for SSH access from the internet and am forwarding both ports 443 (HTTPS) and 80 (HTTP) to the k8s server at the IP address 192.168.2.1.
For added security, my SSH server only allows connections using an RSA private SSH key (no passwords) and disables the root user login. I also use a tool called Fail2Ban to monitor access to the SSH service and ban IP addresses with too many failed login attempts. It’s important to be cautious with these settings to prevent unauthorized access to your server.
This completes the router setup. In the next article, I will focus on the required software for the k3d Kubernetes cluster.