Dynamic Volume Support
Kubernetes has the concept of Persistent Volume and Persistent Volume Claims. A kubernetes manifest can specify that a deployment should have a pod, and that pod should use a persistent volume claim. Here is an example manifest that illustrates how this works.
apiVersion: v1
kind: PersistentVolumeClaim
metadata:
  namespace: test
  name: my-pvc
spec:
  accessModes:
    - ReadWriteOnce
  resources:
    requests:
      storage: 1Gi
  storageClassName: stgClass

---
apiVersion: v1
kind: Pod
metadata:
  namespace: test
  name: my-pod
spec:
  volumes:
    - name: my-volume
      persistentVolumeClaim:
        claimName: my-pvc
  containers:
    - name: my-container
      image: nginx
      volumeMounts:
        - mountPath: "/data"
          name: my-volume
In a PersistentVolumeClaim (PVC), we specify both the requested storage amount and the storage class. Please note that the storage class ID mentioned here is just an example and won’t work as is. StorageClasses enable the dynamic provisioning of storage volumes. When a user requests a PVC without specifying a specific storage volume, the StorageClass comes into play and automatically provisions the appropriate volume. However, for dynamic volume provisioning to work, certain software needs to be installed on the cluster. Commercial cloud providers like Amazon have this capability, allowing them to provision an Elastic Block Store (EBS) volume dynamically using the gp3 storageClassName identifier.
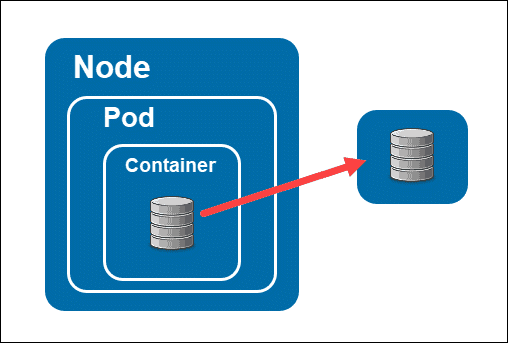
Once the dynamic provisioning is successful, the volume is mounted into the container at the specified mountPoint, which in this case is /data. When using AWS, it’s important to note that volumes have an Availability Zone (AZ) affinity. Each AZ represents a data center, and if you create a volume in, let’s say, us-east-2a AZ, and the pod is running in the same region, everything works fine. However, if the pod gets moved to a different node in a different AZ, such as us-east-2b, the pod won’t be able to mount the volume because it’s not available in its local data center.
Additionally, it’s worth mentioning that after a pod writes data to the volume, you can kill and restart the pod, and all the previously written data will still be there. This ensures that the data remains persistent even through pod restarts.
Adding dynamic storage to your k8d cluster
To enable storage provisioning on a PC without a network attached storage (NAS), we can utilize a pod that supports dynamic provisioning using local disk storage.
Luckily, there is open-source software available for this purpose. You can find it at this link: https://github.com/rancher/local-path-provisioner.
To install it, follow the instructions provided on the website, or alternatively, you can use the following command:
kubectl apply -f https://raw.githubusercontent.com/rancher/local-path-provisioner/v0.0.26/deploy/local-path-storage.yaml
To test this, you can use the following podspec.
apiVersion: v1
kind: PersistentVolumeClaim
metadata:
  namespace: local-path-storage
  name: local-path-pvc
spec:
  accessModes:
    - ReadWriteOnce
  storageClassName: local-path
  resources:
    requests:
      storage: 128Mi

---
apiVersion: v1
kind: Pod
metadata:
  namespace: local-path-storage
  name: volume-test
spec:
  containers:
  - name: volume-test
    image: nginx:stable-alpine
    imagePullPolicy: IfNotPresent
    volumeMounts:
    - name: volv
      mountPath: /data
    ports:
    - containerPort: 80
  volumes:
  - name: volv
    persistentVolumeClaim:
      claimName: local-path-pvc
Take note of the storageClassName — it is called local-path. The infrastructure pod to handle the requests now lives in a new namespace called local-path storage. Be sure to de-provision the volume-test pod (not the provisioner pod) after a test.
Make our new storageclass the default for the cluster
This is just to be safe – to tell you cluster to use this storageClass if its not being specified.
kubectl patch storageclass local-path \
    -p '{"metadata": {"annotations":{"storageclass.kubernetes.io/is-default-class":"true"}}}'
The actual storage location will be where docker stores its data — you can set the location by placing a daemon.jsonfile into /etc/docker That file should have the content
{
  "data-root": "/data/docker-data"
}
On systemd boxes, restart the docker daemon with
sudo systemctl restart docker.service
for the changes to take effect. Make sure the folder exists, and is accessible only to root (sudo chown -r root:root /data/docker-data).
Next lets look at getting another prerequisite going, cert-manager.