
Getting a Kubernetes installation manifest for WordPress
WordPress is a pretty complex php application, that uses a mariadb SQL database as its backing store. There are a ton of kubernetes objects an configuration to set up. Luckily, a lot of the work is already done, and we can use the helm package manager to to a lot of the heavy lifting.
cd /tmp
helm repo add bitnami https://charts.bitnami.com/bitnami
helm dependency update
helm fetch bitnami/wordpress
tar xvzf wordpress*
# possibly adjust the location below
mkdir -p ~/git/k8d/wordpress
cp -R /tmp/wordpress/ ~/git/k8d/
Now you have a full wordpress chart in your ~/git/k8d/wordpress folder.
Patch the values file
Some helm configurations for complex yaml cannot easily be patched with –set statements but should be made directly to the values.yaml file. Add the following content to the bottom of your values.yaml file.
wordpressExtraConfigContent: |
   @ini_set( 'post_max_size', '128M');
   @ini_set( 'memory_limit', '512M' );
   @ini_set( 'WP_AUTO_UPDATE_CORE', true );
That tweaks the WordPress configuration, wp-config.php. When I give more memory to WordPress, problems uploading larger image files to WordPress disappear. The WP_AUTO_UPDATE_CORE=true flag allows critical patches to be installed automatically.
Render the helm chart to yaml
Next, we are going to render the chart into an actual Kubernetes compatible manifest.
#!/bin/bash

mkdir -p rendered
helm template \
  wordpress \
  ./ \
  --set wordpressUsername="user" \
  --set wordpressPassword="wordpress-1234-abcz" \
  --set wordpressEmail="name123@gmail.com" \
  --set wordpressLastName="Last" \
  --set wordpressFirstName="Firstname" \
  --set wordpressBlogName="TestWordPress" \
  --set mariadb.auth.rootPassword="maria-1234-abcz" \
  --set mariadb.auth.password="maria-2345-defy" \
  --set service.type=ClusterIP \
  --set service.sessionAffinity=None \
  --set service.ports.http=80 \
  --set service.httpsTargetPort=8080 \
  --set ingress.enabled=true \
  --set ingress.hostname="wp.yourdomain.com" \
  --set ingress.annotations."cert-manager\.io/cluster-issuer"="letsencrypt-prod" \
  --set ingress.tls=true \
  --set ingress.pathType='Prefix' \
  --set ingress.ingressClassName="traefik" \
  --set ingress.annotations."traefik\.ingress\.kubernetes\.io/router\.middlewares"="cert-manager-redirect-https@kubernetescrd" \
  --set service.annotations."traefik\.ingress\.kubernetes\.io/redirect-entry-point"="https" \
  --values values.yaml \
  --namespace wordpress > ./rendered/wordpress.yaml
Running this installs nothing — it only generates a k8s manifest which it stores in the ./rendered/wordpress.yaml file. The settings that are used come from two places, the values.yaml, and the overriden values (which take precedence) in the bash script, all the –set flags.
This generated manifest almost gets us there – we do need some tweaks by editing portions of the manifest that need changing due to our k3d ingress and storageClass. Lets create another folder called installed-wordpress, and copy the generated manifest there, keeping the name.
mkdir -p installed-wordpress
cp ./rendered/wordpress.yaml ./installed-wordpress/
First Tweak – storage class
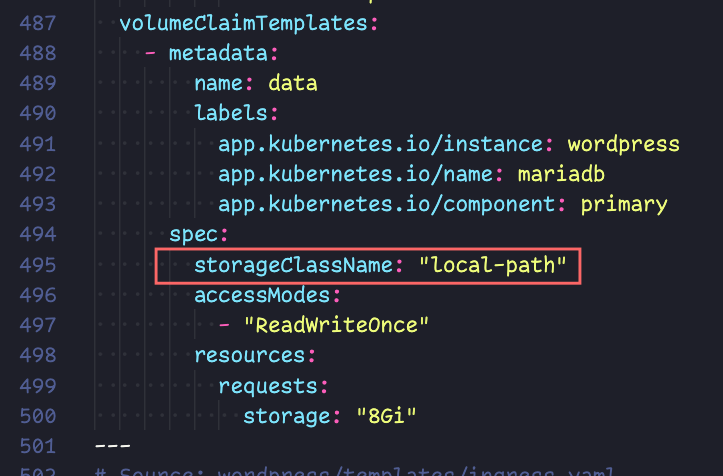
We are going to add two directives, that tell kubernetes specifically what storage class we want to use — it should work without this, but I think its better to be explicit.
storageClassName: "local-path" is the directive we will add, I will show screenshots of where this goes. Since its yaml, pay attention to the text alignment. Your line numbers may be different!

and
Second tweak – Changing the Service of the WordPress (but not of the MariaDB)
Next, we are going to create a new file, called service.yaml. Cut (remove from original wordpress.yaml) and paste the following content into your service.yaml. Note the arbitrary 5681 port — chosen just not to conflict with anything else.
apiVersion: v1
kind: Service
metadata:
  name: wordpress
  namespace: "wordpress"
  labels:
    app.kubernetes.io/name: wordpress
    helm.sh/chart: wordpress-15.2.17
    app.kubernetes.io/instance: wordpress
    app.kubernetes.io/managed-by: Helm
  annotations:
    traefik.ingress.kubernetes.io/redirect-entry-point: https
spec:
  type: ClusterIP
  sessionAffinity: None
  ports:
    - name: http
      port: 5681
      protocol: TCP
      targetPort: 8080

  selector:
    app.kubernetes.io/name: wordpress
    app.kubernetes.io/instance: wordpress
Our ingress goes like this (browser) -> Internet -> wifi-router -> linux-host (traefik pod terminating tls) -> wordpress service -> wordpress pod. After traefik, our traffik runs unencrypted – safe, because I do not expect attacks or sniffing on my home network. Note that the wordpress pod runs on port 8080, so we have to make sure TCP traffic is going there.
Intermission: Checking your DNS
Now is a good time to do a sanity check on your DNS record, I will use my blog name as an example. First you need to find out what your WAN IP address is. This is the address assigned to your router by your ISP at router boot time – re-read the first post in this series that talks about DDNS if you are not sure.
$ dig +short blog.brunzema.com
174.95.83.83
$ curl ifconfig.me && echo
174.95.83.83
The dig command does a dns name lookup and prints the IP address. The curl ifconfig.me shows what the current outgoing IP address is. If your system has a gui/browser, you can go to https://ipchicken.com and it will show the same info as the curl statement, which works in a terminal. The two IP addresses must match if the next steps are to work.
Please be aware that it may take a bit of time between for edits to your DNS record to propagate, or be available. The delay is usually short, like a minute, but can take up to 15 mins or longer if you are unlucky.
Next steps – Ingress, and getting a TLS secret
I need a bit more space to discuss this, and will do so in the next post. Once all the tweaks to the yaml manifests are in place, we will apply them one by one, first the deployment and other needed k8s objects, then the customized service, and then finally two ingress objects, one for the normal TLS, and one to trick cert-manager in giving us a TLS secret.